Monday, April 22, 2013

Creative Patches For Kid's Jeans

How To Make Kid's Jeans Last A Little Longer

If you have kids, you know what they do to their jeans and how the cost of new clothes can add up. Here are a couple cute ideas to stretch the life of those "ruined" pants.

Monster Mouth
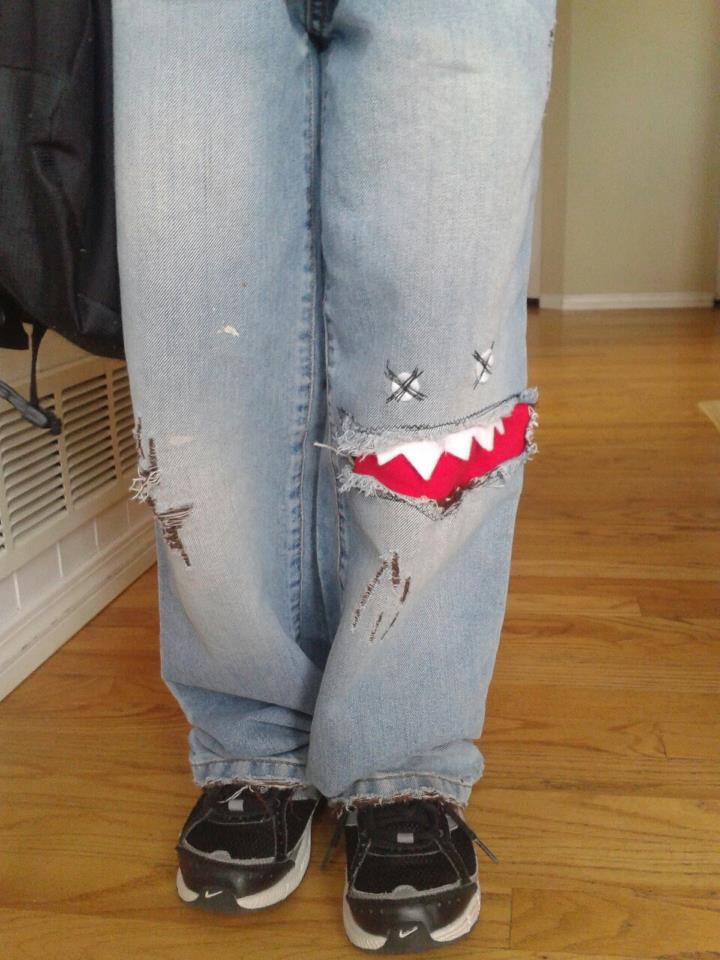
The first idea is one I've seen floating around Pinterest and worked well with my son's pants that had a huge hole. Of course it started as a small rip and throughout the course of the day at school, he made it worse. These were really cool, distressed jeans that fit great and I hated to have to throw them out, so we tried the monster face. I used some scrap red fabric for the inside of the mouth and white felt for the eyes and teeth. Just cut red fabric a little bigger than the size of the hole and with the teeth, attach to inside of jeans with sewing machine. This took a little finesse, good thing these pants were baggy! Next cut circles for eyes and sew those on as well. My son thinks these are so cool and yippee, pants have been saved!


Flower Child
The hole in my daughter's pants was caught early, so it was still pretty small. I got a twill iron-on patch from Walmart's craft department. I wanted to style it up a bit so, after we decided on flowers, I cut one big enough to cover the hole. Before ironing on, I used yellow thread in the sewing machine and went back and forth to make a yellow center for our flower. Then I used pink thread and stitched around the edge of flower.
I also cut out two additional flowers, just to even out the look on the other side and ironed on. These pants still fit in the waist but were starting to get a little short so, I just attached some lace and ribbon to the bottom cuff. This added the length we needed and looks really cute. 


Super Star
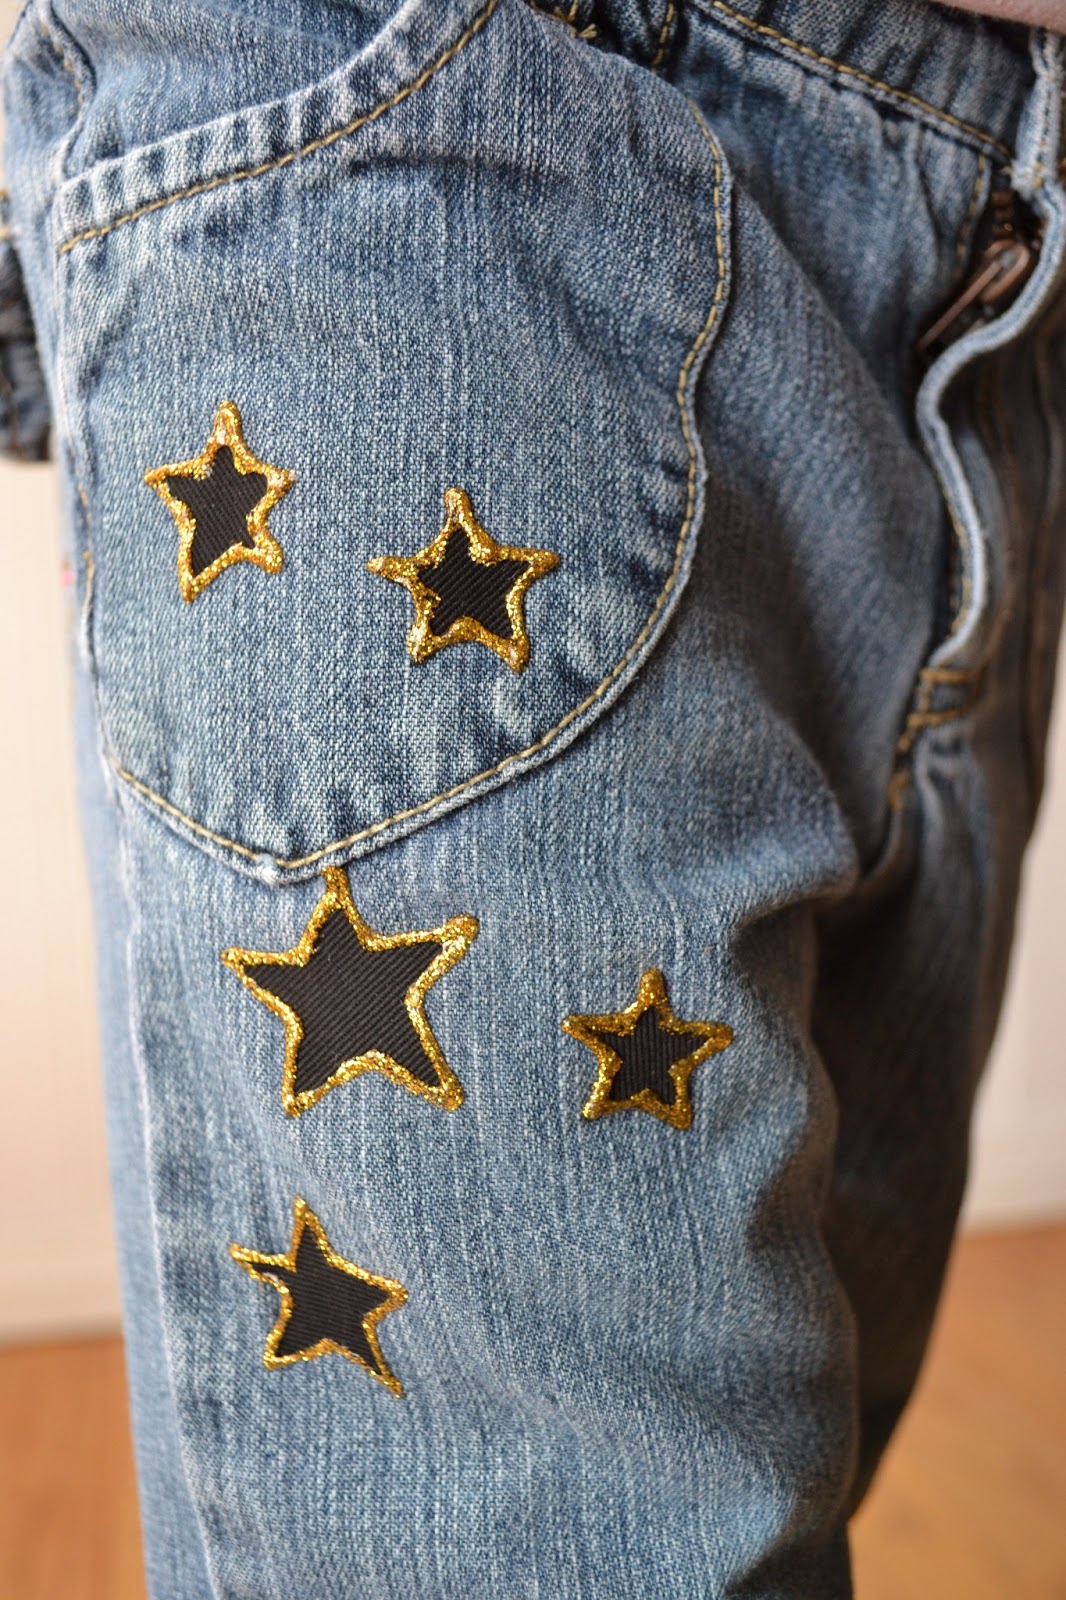
Another hole, of course. It was bound to happen with these ones, the denim was so thin. I got another iron-on patch and this time, cut out stars. Of course, just the knees needed to be done but why not go all out? After I ironed on, I went around the edges with some dimensional glitter craft paint. Afterward I wished I had done it with silver, but gold is what I already had in the house and seriously, a four year old doesn't really care what color the glitter is.


Thank you so much for visiting my blog!
Project Gallery

I will be sharing with these great blogs!


Follow me here:

Sunday, April 14, 2013

DIY Ombre Dip Dye Sweatshirt

Make Your Own Ombre Style Shirt

This off the shoulder sweatshirt is great for throwing over workout clothes when you're done at the gym.


The Ombre look is so popular now and is really easy to achieve. For this project, all you need is some dye(I used Rit) and a cotton or poly-cotton blend shirt.

I'm big into saving money and re-purposing when I can, so I looked in the thrift stores first for a sweatshirt. No luck there so I got this grey 50/50 poly-cotton blend sweatshirt on clearance at Walmart.

To start, I washed the shirt and left damp.
  1. I used my stainless steel sink for the dye, but you may want to use a large container on a protected surface. Follow instructions to dissolve dye. I filled sink a few inches, added salt and about 2/3 of the dye powder.
  2. Hold the shirt at the top or put on a hanger and hold by hanger, dip shirt into dye up to the place where you want the color to start and pull out immediately. This is going to be the lightest color.
  3. Now dip again, leaving the top third of the already dyed section out, and hold it in there for about 15 seconds(depending on your preference) to achieve a darker color.
  4. For the darkest color, dip the last third of dyed section and hold even longer. I wanted the bottom of my shirt really dark so I added the rest of the dye powder hung it over the faucet and left for a couple minutes. (100% cotton will hold dye best) 
  5. When you achieve the colors you like(you may need to dip a couple more times to make sure it's even), squeeze out excess liquid and hang to dry overnight. I just hung mine outside...easy no mess.
  6. Next day, I rinsed in cold water and washed in washing machine.
*For every layer of color, I wiggled the shirt back and forth a bit so you wouldn't be able to see a straight line and it would have a more faded look. 

For off the shoulder look, I started cutting from about 1 1/2-2 inches from where the seam for the sleeve is, across to the other side going down to just below the existing collar. You should put the shirt on first to decide where you want it hang. Do a little at a time, then if you need to cut more you can.

Click HERE to see another ombre dip dye shirt project!

Tuesday, April 9, 2013

Corn Chowder

Corn Chowder

I love soup, especially on a cold day. Living in Colorado, those aren't hard to come by! This recipe is a childhood favorite of mine. Here's how I make it...

Corn Chowder Recipe from Over The Apple Tree

12 oz. bacon
1 c. chopped onion
4 c. peeled and diced potatoes
2-14 oz. cans cream style corn
1 c. frozen corn
2 1/2 c. milk
salt
pepper

  1. Cook bacon. The easiest way to do this is in the oven. Lay out bacon on a large cookie sheet and bake at 350° till brown. Place on paper towels to absorb grease.
  2. In large pot, using a little of the bacon grease, cook onions till translucent.
  3. Add potatoes, corn and milk. Simmer on med-low till potatoes are tender, stirring often.
  4. Chop bacon and add towards end of simmer
  5. Season with salt and pepper to taste.


I will be sharing with these great blogs!


Follow me here:

Grow An Apple Tree From Seeds

Save your seeds next time you eat an apple to grow your own apple tree!

My kids want to plant every seed they find, so when my daughter dug the seeds out of her apple, I figured we could give it a try. 


Steps for success:
  1. Allow your seeds to dry out for a few days
  2. Place seeds in a Ziploc baggie with a wet paper towel. Place in refrigerator for about a month or until they start to sprout.
  3. Plant seeds in small cup with soil and wait for some growth. Make sure soil stays moist.
  4. Replant seedling into larger pot, one seed per pot recommended so they don't have to compete for nutrients.
  5. When plant reaches 1.5-2 ft tall, carefully transplant outdoors in full sunlight, making sure there is enough room around for growth.


Thank you so much for visiting my blog!
Project Gallery

I will be sharing with these great blogs!

Follow me here:

Chocolate Oatmeal No Bake Cookies

The Classic Chocolate Oatmeal No Bake Cookies

These are so good and for some reason, I haven't made them in years. This recipes is not new, but why mess with perfection?


1/2 c. butter
1/2 c. milk
2 c. sugar
4 Tbsp cocoa powder
1 pinch of salt
3-3 1/2 c. quick cooking oats
1/2-1 c. peanut butter
1 tsp. vanilla
In  large pot, bring first five ingredients to a boil, then continue to boil for 1 minute. Remove from heat and add remaining three ingredients. Mix well. Drop spoonfuls onto wax paper and allow to cool.

Friday, April 5, 2013

Military Wife Purse From ABU Shirt

Custom Gear From Old Military Uniforms

Show your pride in your favorite military member with a stylish bag!


When my girlfriend asked me to do this project, I didn't have the first clue where to start. I've never made a bag before and have limited sewing knowledge. Did I let that stop me, of course not! She mailed me the shirt and oh, did I mention she wanted bamboo handles? She's lucky I love her, because this just got harder...I was scratching my head for a good month before I felt confident enough to start. 

 I looked all over the internet but didn't find any patterns I liked (not that there are that many) so, I found a picture of a purse that I thought was stylish and simple. Well, turned out not to be so simple and my design changed daily to accommodate problems I was running into.

 I sketched out a pattern on some large paper of the shape I wanted and started cutting. The pattern for the outside of the purse was a little wider than for the lining because I wanted to do a little gathering in the center.

I used interfacing on the bottom/side pieces of the ABU fabric and then on the front/back of the flower lining to make it more stiff so it will keep its shape better. The fabric to hold the handles is four pieces of crescent shaped material sewn together also using interfacing in between.


After the outside and lining pieces were put together, I placed one inside the other and lined up the edges. I connected these together with the black binding. I used a smaller binding on the edge of the fabric for the handles. Last, I sewed the handles on to the outside of the bag.


There are a couple pockets on the inside that I sewed into the lining before I put it all together. 


I'm not done yet! I still have bits of shirt left, so...


We've got an across the body bag for her daughter,


and a name tape bracelet and cuff for her two sons!


I'm super proud of this project and am truly amazed that it came out actually looking like a purse. 
Please support our military and their families.
Related Posts Plugin for WordPress, Blogger...