Sunday, June 30, 2013

Kitchen Table Makeover

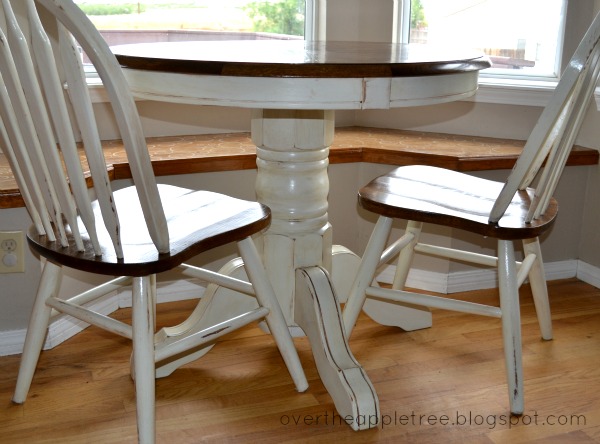
Painted Kitchen Table and Window Seat

We've have had this dinette set for almost 14 years and it was starting to look its age. The finish was coming off and the veneer had some damage in a couple small places. This little table fits perfectly with the window seat in my breakfast nook, so getting rid of it was not an option. 

Table and Chairs
The table top got stripped(Citristrip Stripping Gel) and damaged areas were repaired with some wood glue and stainable wood filler.  We stained Dark Walnut. The bottom part of the table to be painted was sanded and primed. We painted off-white, distressed with some sandpaper and then applied Valspar Translucent Color Glaze. After brushing on glaze, with a damp cloth, we lightly rubbed off excess until desired color was achieved. When everything is thoroughly dried, apply polyurethane. The top especially needs a lot, I think we did about 4 coats.

Like with the table, for the chairs we stripped the seat because we re-stained it. The back and legs were sanded, primed, painted, sanded again, and glazed. Polyurethane the whole thing, extra coats on the seat.

DIY kitchen table makeover by Over The Apple Tree


DIY kitchen table makeover by Over The Apple Tree

DIY kitchen table makeover by Over The Apple Tree

DIY painted kitchen table by Over The Apple Tree


Window Seat
In addition to the jacked up table, the window seat also needed some help. It was stained the same generic oak finish that our cabinets used to have and it definitely would have looked horrible next to the table after we refinished that. I wanted to do something different and interesting, so...Pinterest saves the day again! After I saw this post from Domestic Imperfection, I knew what to do with my window seat.

DIY Window seat makeover by Over The Apple Tree

The window seat got stripped and sanded. I then stenciled on a design with white paint. I sanded again to give a more distressed look then re-stained(Special Walnut) and applied 3 coats polyurethane.

DIY window seat makeover, stenciling by Over The Apple Tree

DIY Painted kitchen table by Over The Apple Tree

Be sure to also check out our Custom Built Desk and Flag End Table

Thank you so much for visiting my blog!
Project Gallery

I will be sharing with these great blogs!

Follow me here:

Thursday, June 27, 2013

Honey Mango Frozen Yogurt

I have a major sweet tooth that usually hits me after dinner, so I generally try to find healthier choices to satisfy it. I found this recipe in my Self Magazine*
I changed it up a little bit using what I already had around. Instead of the recommended healthier Greek yogurt, which is packed full of protein but quite tart, I used Trader Joe's Vanana Low Fat Yogurt. It's a subtle banana flavor that is pretty sweet by itself.

Add 1-1/2 cups of frozen mango pieces to your food processor or your blender.


Then add roughly 1/2 cup of Trader Joe's Vanana Yogurt

Drizzle 2 tbsp of honey on top

Blend/Chop until all the mango pieces are processed and the mixture is a soft sorbet/frozen yogurt texture. If it is runny, add more mangoes. If it is not sweet enough, add more honey. It's that easy!

Serve immediately and enjoy! This makes enough for two small servings. Toss the other one in a container in the freezer for another night.


Wednesday, June 26, 2013

Summer Tube Tops

Thrift Store Refashion -Tube Tops

For some reason I'm really into tube tops this year. I actually found one in Goodwill but it didn't fit right and I wasn't crazy about the color anyway. I got to thinking I could probably make one...back to Goodwill we go! Here are two different styles I made.

T-Shirt Tube Top
T-shirt Tube Top by Over the Apple Tree
I started with an extra large, practically new t-shirt. First, I wanted to make it look a little more vintage, so I started by using a fine grit sandpaper to rub away some of the print. Resist the urge to hurry up & get this over with and rub lightly!


Oh, I was supposed to do it gently...yup, sanded a hole right through it!
After a wash, I cut straight across, just below the neck line and down the sides. Since this shirt was so big, I ended up taking a couple inches off the sides. If it was smaller  you could just cut off the sleeves and straight down under the sleeves.

Summer tube tops >> Over The Apple Tree

Summer tube tops >> Over The Apple Tree


Turn right sides together and sew straight down sides. Depending what size elastic you use( I think mine was 3/4), fold down top about 1 inch and sew to make the pocket for the elastic. Make sure you leave an opening to put the elastic in. After you feed the elastic through with a safety pin, secure the edges of elastic really good. At this point I would try it on and make sure the elastic is tight enough(yes I had to adjust mine!) Close opening.


If you lined up the bottom hem when you sewed the sides, you could leave it as is but mine was misshapen and also way too long. I just cut straight across the bottom for the length that I wanted. I didn't hem, just left the edge unfinished, but I did reinforce the seam on the sides so that it wouldn't unravel.

Summer tube tops >> Over The Apple Tree


Skirt Into Tube Top
Turn a skirt into a summer tube top by Over the Apple Tree

Summer tube tops >> Over The Apple Tree


*I always to forget to do the before pictures, but you get the idea, it's a skirt!

This is a size small, A line, rayon, dress skirt. When I pulled it up and under my arms, the elastic waist happened to fit perfectly. Really, really happy about that because sewing rayon isn't fun for me!

Next thing to do is decide where you want the elastic for the waist to go. Put it on and stand in front of a mirror so you can get a better idea. Use a safety pin to mark the spot. You need to sew a pocket for the elastic waist.

Summer tube tops >> Over The Apple Tree

Summer tube tops >> Over The Apple Tree

 Best way to do this is:
  1. Lay the skirt flat on ironing board, right side out. 
  2. Fold the bottom edge up all around, the fold should be where you put the safety pin. 
  3. Make sure it's even all around and iron along fold. 
  4. Insert pins along fold so it doesn't slip when you're sewing
  5. Sew along fold leaving enough space for your elastic to fit in and leaving an opening to get the elastic in there. I used 1/4 inch elastic for mine.
  6. Insert elastic, sew ends together.
Again, throw this on and make sure the elastic is tight enough before you close up the opening(yes, I had to adjust mine...again!!)


Summer tube tops >> Over The Apple Tree
This is what it looks like laying flat with elastic in waist


Summer tube tops >> Over The Apple Tree


Thank you so much for visiting my blog!
Project Gallery

I will be sharing with these great blogs!

Follow me here:

Saturday, June 22, 2013

Vintage Style Apron


Vintage Style Aprons

This is my first contribution to Over The Apple Tree and I'd like to share my sewing endeavor I took on this afternoon during a little downtime from a thunderstorm. Sewing is not my thing. I'm that girl who always ends up with strings jammed in the bobbin somehow. And I always seem to think up these grand ideas that involve sewing and quickly give up once I pull out that sewing machine. So, in light of conquering a machine and learning new skills I have decided to take on sewing.

I'm easing into things with a simple project inspired by my grandmother Clara's original handmade apron. She taught me to knit, crochet, bake, and craft but I never thought to ask her how to sew!


While thrift shopping for other projects I found this adorable skirt below but of course it was a size 0. I immediately thought of my grandmother's apron and thought how easy it would be to transform this skirt.


I started by folding the skirt in half with the button on one end and the tag side on the other and laying in out on the table (basically side to side instead of front to back as shown above).

I made one cut up the skirt from the bottom to the waste about 6in from what is the back of the skirt. This way when you opened up the skirt and laid it flat the pockets were symmetrical and the button in the middle of the apron.


Then I took the back piece for the straps and unfolded it and cut it into equal pieces in width.
Next I ironed the hem line edges of the sides of what was now the apron by folding a 1/2" piece over and ironing and then repeating once more for a clean edge. I also ironed the hem lines of the strap pieces in the same manner.

After sewing all the edges I attached the straps one on each side at the top of the apron and the project was complete! It took about 30 minutes all together and that included one small fight with the sewing machine.


To see more great vintage items visit Queen St. Artisan's Etsy shop


Follow me here:
Shared With: Craft-O-Maniac
                       Etsy Cottage Style


Friday, June 21, 2013

Fish Tacos

Perfect Summer Dinner - Fish Tacos

Fish Tacos by Over the Apple Tree

A lot of people think "yuck" when they hear fish tacos and once upon a time, I was one of them. When we first moved to CO, we were out one day driving around and saw all these Dell Taco restaurants. We decided to give it a try and upon seeing this huge advertisement for their new fish tacos, we all agreed it sounded pretty gross. We ordered our food to go and discovered they had accidentally put a fish taco in our bag. We tried...we loved! I have been hooked ever since.

Fish Tacos by Over the Apple Tree

 Start by preparing the pico de gallo. You should know, I rarely measure stuff so writing recipes is really hard for me!

  • 3 roma tomatoes, seeds out
  • about half an onion
  • chopped fresh cilantro
  • salt
  • lime juice

Dill mayo...you can use plain mayo, but I put dill on all my fish. I'm actually a Miracle Whip girl but I will eat mayo on only 2 things and this is one of them.

  • couple scoops of mayo(we use canola mayo)
  • sprinkle of dry or fresh dill weed
  • squirt of lime juice
Now shred up some green cabbage and slice some avocado if you are so inclined.


The fish...in most restaurants they serve fried fish in fish tacos, but we are healthy, so we pan fry in some olive oil. Much better for you and easier than frying anyways!
  • Tilapia fillets(or whatever fish you prefer)
  • Mrs Dash Southwest Chipolte Seasoning
Now, just heat up some corn tortillas on a hot griddle, pile on all these yummy ingredients and chow down!


Fish Tacos by Over the Apple Tree

See more recipes on my blog!

I will be sharing with these great blogs!


Follow me here:
Follow Over The Apple Tree's board Just Eat! on Pinterest.

Monday, June 10, 2013

Weekend Bathroom Makeover

Weekend Project - Easy Bathroom Makeover


I'm not sure why it took so long to fix this bathroom. I guess I didn't mind the brown that was there and compared to the ugliness in the rest of the house when we moved in four years ago, this little space was the least of my worries. What finally gave me motivation were all the mirror framing tutorials on Pinterest. It's genius really...I enjoy having the large mirrors that they put into all these newer homes but they aren't very attractive and we all end up with the same builder grade fixtures. Also, it's a huge money saver to work with what you got!

First things first, get rid of the ugly brown. This is Provincial Cocoa Rose from Walmart.


Now on to the mirror! Here's how we did it(by we, of course I mean my husband did it and I supervised)
  • measure the mirror and go pick up some wood trim and liquid nail
  • cut trim to size of mirror and cut 45 degree angles in corners so it all fits together
  • paint trim front and at least half of the back because you will see the refection of the backside in the mirror
  • using the liquid nail and starting with the bottom piece, stick the molding right on top of the mirror, hold in place with painter's tape.
  • Allow liquid nail to dry, this could take up to two days
  • not an expert cutting those angles? Wood filler is your friend! Fill in the gaps, allow to dry and touch up paint
Here is a great tutorial from This Thrifty House showing the method we used.

This is another way to frame with no angles from Our Suburban Cottage that actually looks much easier but I didn't see this one till it was too late...next time!


The new valance took just minutes...I used a scrap of soft, lacy, black fabric that I already had. Fold down about 2 inches and sew straight line across to make the pocket for the curtain rod. I spray painted a regular white metal curtain rod black so that it wouldn't show through the lace. After I hung curtain, I used some coordinating ribbon wrapped around and tied in a bow to pull it up a little bit which help to disguise the rough bottom edge.

These three things made a huge difference in our bathroom and I'm so glad we finally got it done. Now I need to do something about the ugly counter top!


Related Posts Plugin for WordPress, Blogger...