Friday, December 30, 2016

Re-purpose Holiday Decorations: Deer Head

Get a can of spray paint and re-purpose holiday decorations in to everyday home decor.

Re-purpose holiday decorations in to everyday home decor by Over The Apple Tree

You've seen them everywhere, faux taxidermy heads are hot home decor right now! Unfortunately, they can also be pricey. Now is your chance! Go immediately and get a holiday deer head on clearance! Doesn't matter what it looks like because as long as it can be spray painted, it's all good. I found mine at Walmart on clearance for the bargain price of(drum roll) $3.49!! Can't find a deer head? Check the craft store for a paper mache head.

So I've noticed white is the common color for these heads, but I like to be different and also my home accents are mostly dark colors. I also think it would be cool to do the antlers a different color than the head. Maybe a white head with teal antlers or even a metallic color. Whatever your color pallet, you can find spray paint to match.

So my head is glitter. It took MANY coats of spray paint to get all this glitter covered. This is an exercise in patience for me because I HATE to wait for paint to dry! So that's it! Covering something in spray paint couldn't be easier right?

Re-purpose holiday decorations in to everyday home decor by Over The Apple Tree

Re-purpose holiday decorations in to everyday home decor by Over The Apple Tree

Re-purpose holiday decorations in to everyday home decor by Over The Apple Tree

Re-purpose holiday decorations in to everyday home decor by Over The Apple Tree


Thank you so much for visiting my blog! Want to see more home DIY's?
Project Gallery

I will be sharing with these great blogs!


Follow me here:


Sunday, December 4, 2016

Fleece Mermaid Tail Blanket

Fast and cheap way to make a mermaid tail blanket

DIY Fleece Mermaid Tail Blanket, very inexpensive- by Over The Apple Tree

My daughter has been wanting a mermaid tail forever! Crochet mermaid tails have been making the rounds online, but I haven't had any desire to jump on the trend. I finally broke down when she asked for one for Christmas. When I went to the store to get the yarn to crochet one, I passed by a bin of cheap fleece blankets and changed my plans.

Walmart has fleece throw blankets for $2.50! I grabbed two of the blankets, one for the lining and one for the outside main color. Then I got a 1/2 yard of green fleece($1.34) from the fabric department to use for the fins. I planned to have the tail opened in the back, similar to some of the crochet mermaid tail designs. But after seeing this tutorial from Made By Marzipan, I liked hers and decided to go that way. I just did one small thing different. Instead of using a separate piece for the waist band, I made the liner longer at the top and then folded it down to create the waist band.

DIY Fleece Mermaid Tail Blanket, very inexpensive- by Over The Apple Tree

DIY Fleece Mermaid Tail Blanket, very inexpensive- by Over The Apple TreeDIY Fleece Mermaid Tail Blanket, very inexpensive- by Over The Apple Tree


DIY Fleece Mermaid Tail Blanket, very inexpensive- by Over The Apple TreeDIY Fleece Mermaid Tail Blanket, very inexpensive- by Over The Apple Tree


DIY Fleece Mermaid Tail Blanket, very inexpensive- by Over The Apple Tree

DIY Fleece Mermaid Tail Blanket, very inexpensive- by Over The Apple Tree

This is my first homemade Christmas present this year. Perhaps I  should have started earlier, but I can't help when inspiration hits! 

Need ideas? Check out this Sock Monkey Tutorial and Gifts Kids Can Make


Thank you so much for visiting my blog!
Project Gallery

I will be sharing with these great blogs!


Follow me here:


Tuesday, November 29, 2016

Celtic Weave Fingerless Gloves- Free Pattern

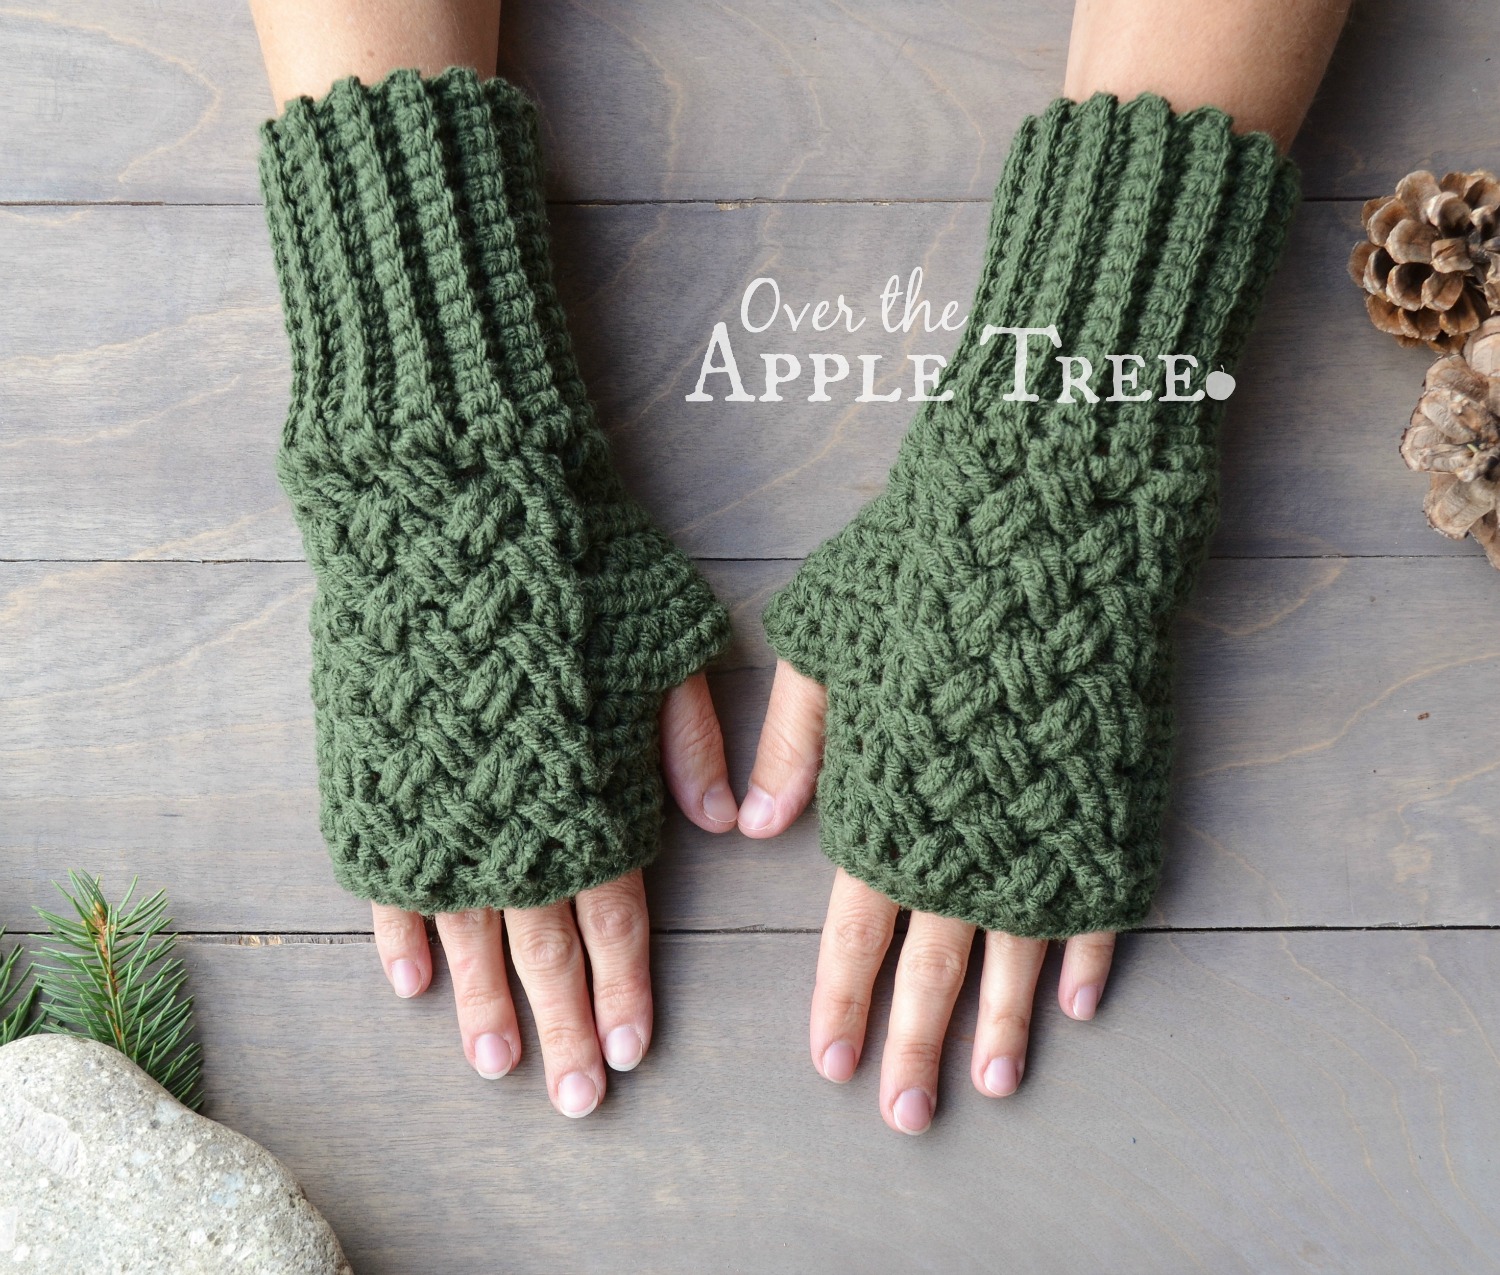
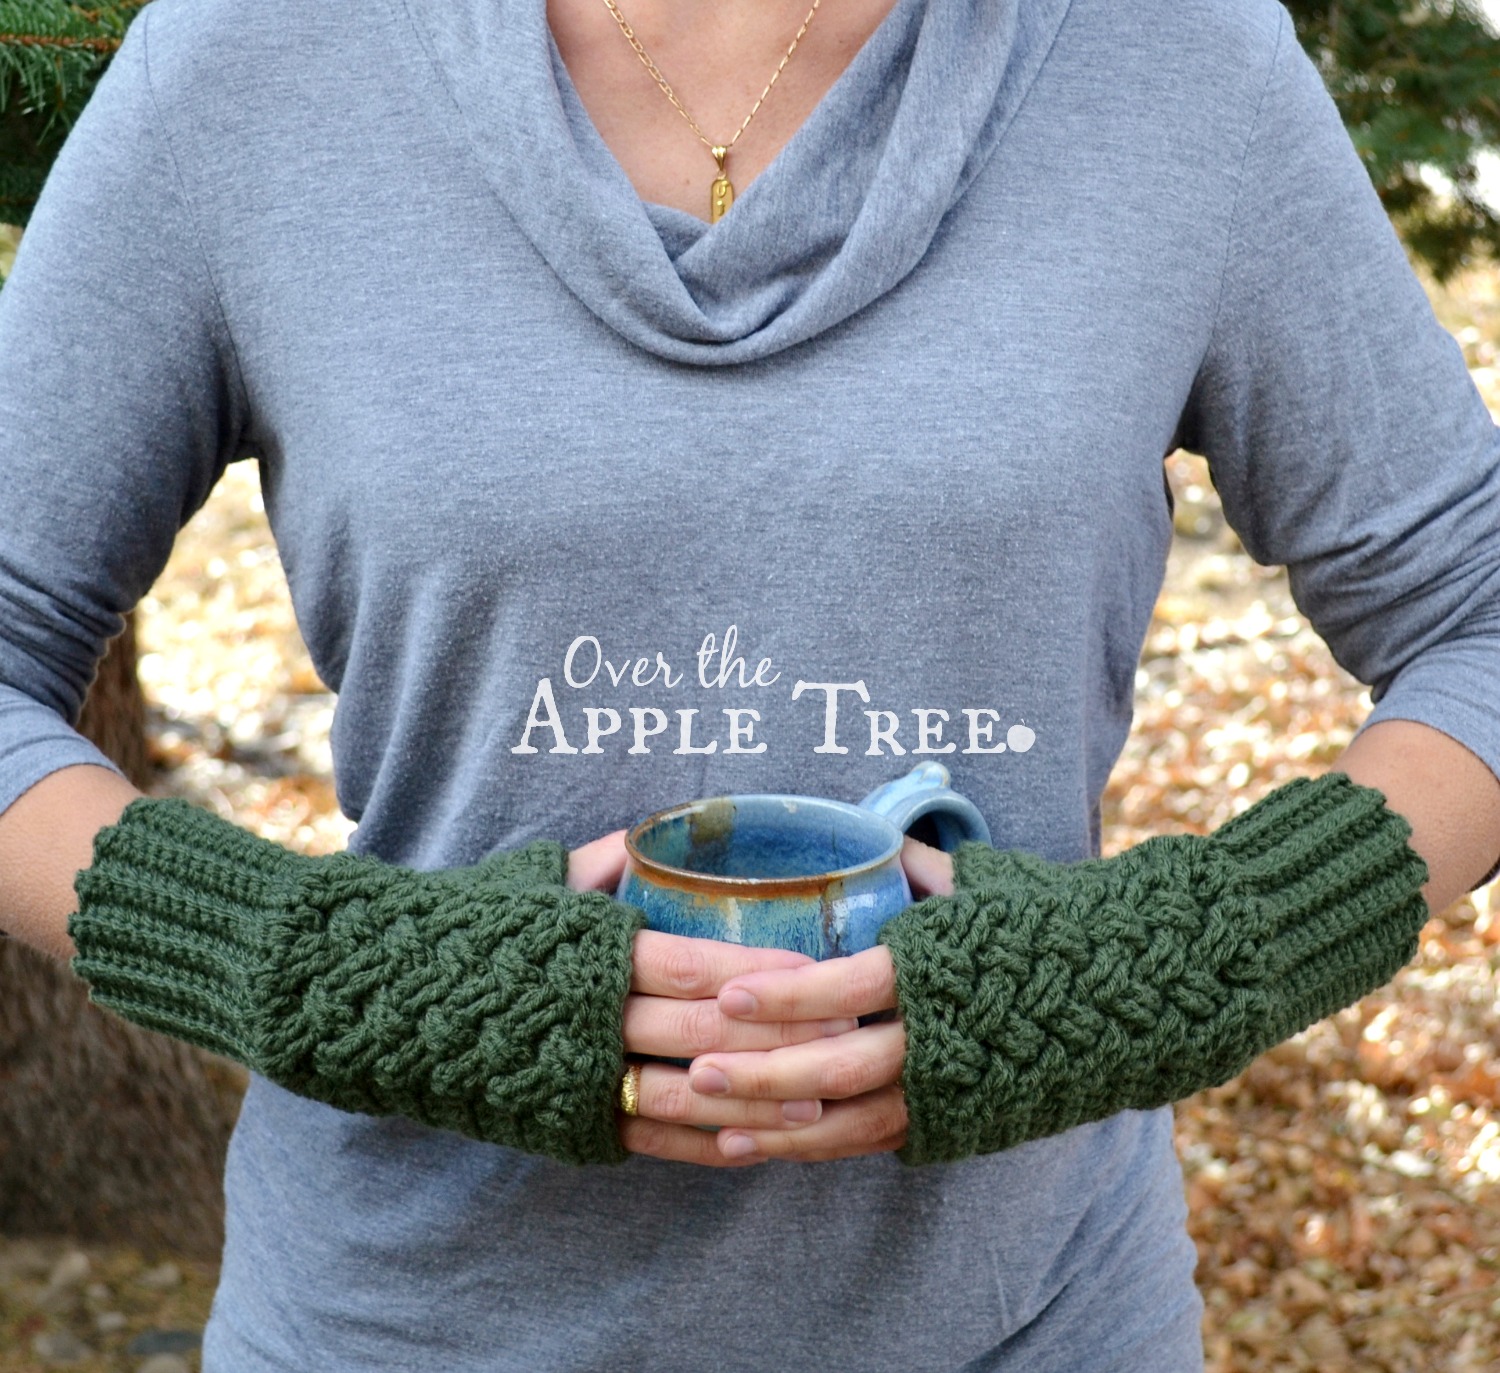
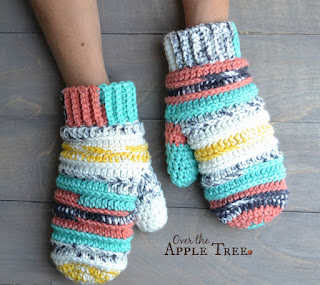
I was inspired by the Outlander TV series to create some more textured crochet items for my store. After making a few fingerless gloves, I took a stab at creating my own design. I came up with this pattern almost a year ago and finally decided to type it up and offer it for free. Happy Holidays!


Celtic Weave Fingerless Gloves, Pattern by Over The Apple Tree

Celtic Weave Fingerless Gloves, Pattern by Over The Apple Tree

These woman's gloves fit small-medium depending on your tension. For a larger size, you can go up in hook size or add stitches to the side hdc section. The top of the glove is worked in turning rows and then stitched together up the back. I like working these flat, but of course, you could join and turn as you work. As a matter of fact people have had really strong feelings about not stitching up the back. Do whatever you feel comfortable with!

I tried to make this pattern as easy to follow as possible with the color coded sections, but I would not recommend this project for beginners.

Here is a helpful Celtic weave video tutorial from Pattern Paradise.

US crochet terms
Worsted weight yarn
Hook size G(4.25)
BPTC= Back Post Treble Crochet
FPTC= Front Post Treble Crochet

Wristband
Ch 16 (Feel free to adjust length to make longer or shorter cuffs)
1. Sc in second from hook and in each chain to the end. Ch 1, turn(15)
2.-28. 15 sc in BLO. ch 1, turn (15)
Join last row to beginning chain with sl st to form the cuff. Turn inside out so that the sl st seam is on the inside. Rotate to work top of glove along the sides of the rows.

 *Note: I have 28 rows for the cuff and then I say to work 30 hdc in row 1 top of glove. I did this because I have skinny wrists and preferred my cuff to be tighter. It means you will have to work 2 hdc in a couple of the stitches for row 1 top of glove. If it makes you more comfortable, you can increase the cuff to 30 rows for it to come out even.

LEFT GLOVE
Top of glove
1. Ch 2, work 30 hdc into ends of sc rows on cuff. Join with sl st to first hdc. Do not turn yet.

2. Ch2, 1 hdc in same as join, 8 hdc *
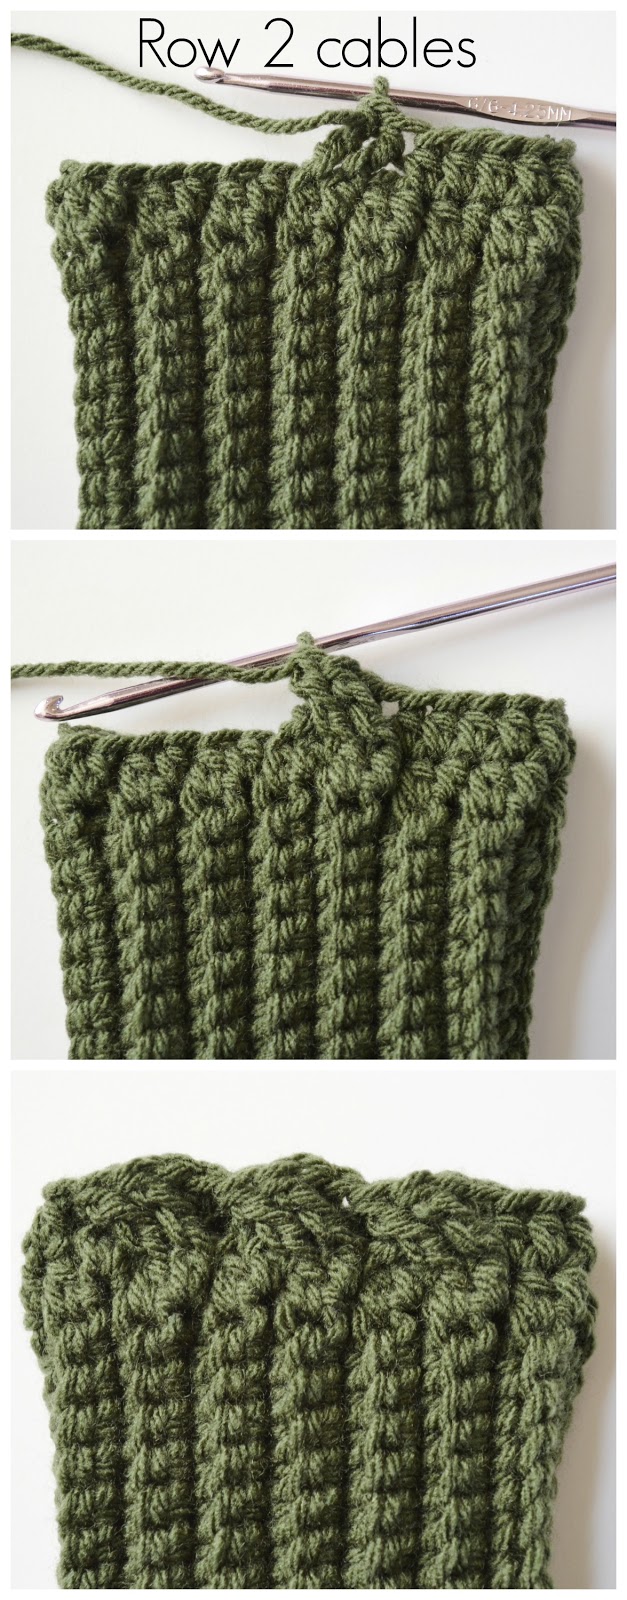
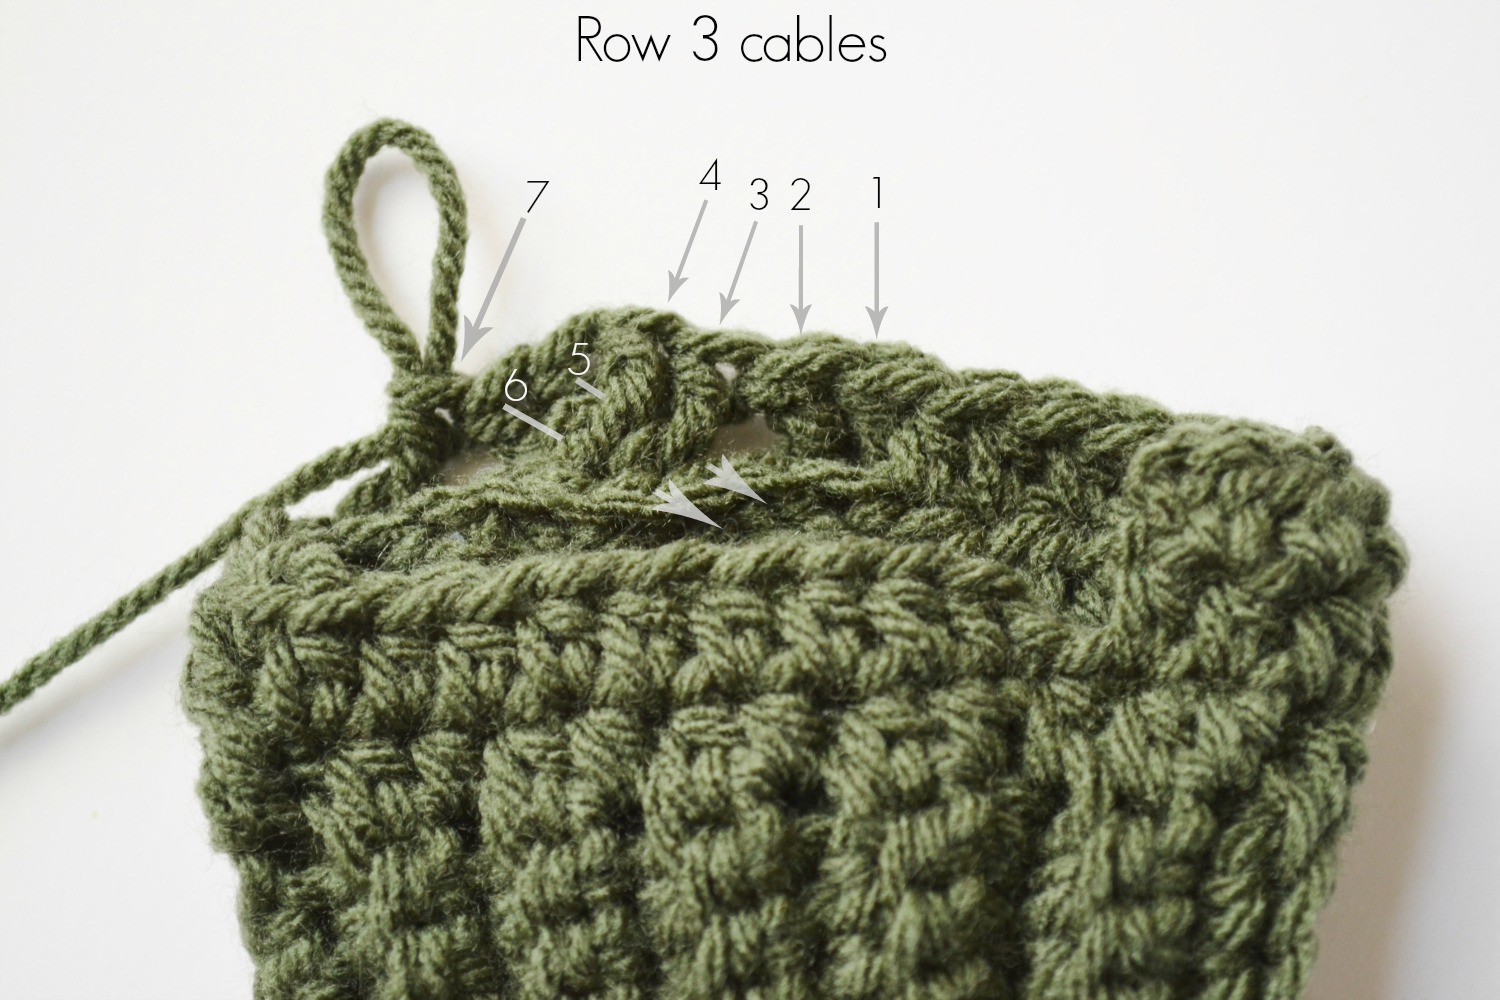
(sk 2, FPTC around next 2, FPTC around 2 skipped) Repeat from* 2 more times. 9 hdc. Ch 2, turn

3. 9 hdc, BPTC around first 2, *(sk 2, BPTC around next 2, BPTC around 2 skipped posts). Repeat from*, BPTC around last two, 3hdc, 2 hdc in each of the next two stitches, 4 hdc. Ch 2, turn

4. 4 hdc, 2 hdc in same, 2 hdc, 2 hdc in same, 3 hdc, (repeat cables row 2), 9 hdc, ch 2, turn

5. 9 hdc, (repeat cables row 3), 3 hdc, 2hdc in same, 4hdc, 2 hdc in same, 4 hdc. Ch 2, turn 

6. 4 hdc, 2 hdc in same, 6 hdc, 2 hdc in same, 3 hdc, (repeat cables row 2), 9hdc. Ch 2, turn

7. 9 hdc (repeat cables row 3), 3 hdc, 2 hdc in same, 8 hdc, 2 hdc in same, 4 hdc. Ch 2, turn

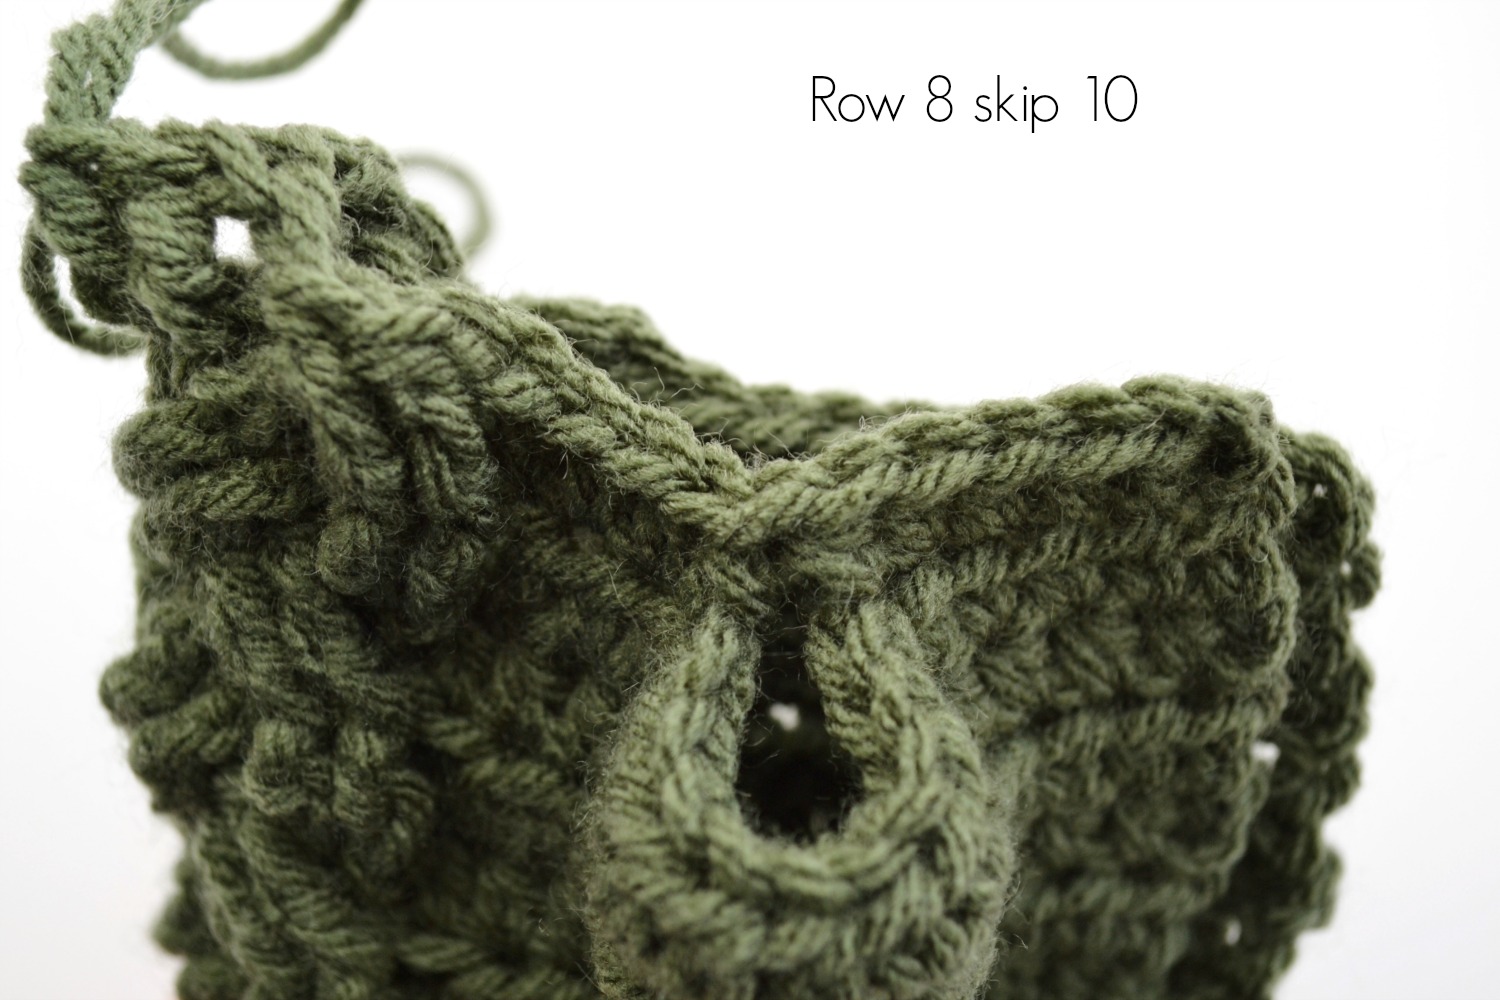
8. 5 hdc, skip 10, 4hdc, (repeat cables row 2), 9 hdc. Ch 2, turn

9. 9 hdc, (repeat cables row 3), 9hdc. Ch2 turn

10. 9 hdc, (repeat cables row 2), 9hdc. Ch2, turn

11. 9 hdc, (repeat cables row 3), 9hdc. Ch 2, turn

12. 9hdc, 12 sc, 9hdc. Ch1, turn

13. sl st across. Leave long tail to sew together

For RIGHT GLOVE start the same as for left glove but for rows 3-8 top of glove,  flip the side with the increases for the thumb hole but still work the cables the same. So row three, right hand would be... 4hdc, 2 hdc in each of the next two stitches, 3 hdc, BPTC around first 2, *(sk 2, BPTC around next 2, BPTC around 2 skipped posts). Repeat from*, BPTC around last two, 9hdc. Ch 2, turn


Celtic Weave Fingerless Gloves, Pattern by Over The Apple Tree

Celtic Weave Fingerless Gloves, Pattern by Over The Apple Tree

Celtic Weave Fingerless Gloves, Pattern by Over The Apple Tree

Celtic Weave Fingerless Gloves, Pattern by Over The Apple Tree

Celtic Weave Fingerless Gloves, Pattern by Over The Apple Tree

Celtic Weave Fingerless Gloves, Pattern by Over The Apple Tree

Celtic Weave Fingerless Gloves, Pattern by Over The Apple Tree

Celtic Weave Fingerless Gloves, Pattern by Over The Apple Tree


If you make these gloves to sell, please be courteous and give credit to me as the designer with a link back to this blog post. Do not copy and post this pattern or claim it as your own. Do not try to sell this pattern. Do not re-publish photos as your own.

Save pattern in Ravelry!

Love crochet? See more of my projects here


I will be sharing with these great blogs!


Follow me here:

Monday, October 10, 2016

My Latest Crochet Projects

I really, really like to crochet. I'm constantly finding patterns I want to try or yarn I can't wait to make something with. Today I'm sharing some things I've been working on for the last couple months. I also post finished items on my Ravelry project page. I find it so helpful to see other's finished items for a pattern that I like. You can also see any new WIPs on my Instagram. Anything I don't keep or that I gift to someone else goes to my Etsy Shop.

My Latest Crochet Projects with pattern sources by Over The Apple Tree
Mittens from Frayed Knot

Katula Hat by KT And The Squid

My Latest Crochet Projects with pattern sources by Over The Apple Tree
Katula Hat

My Latest Crochet Projects with pattern sources by Over The Apple Tree
Lattice Hat by Sarah Arnold

My Latest Crochet Projects with pattern sources by Over The Apple Tree
My Color Pool Scarf, see more info here

My Latest Crochet Projects with pattern sources by Over The Apple Tree
Mittens/Fingerless Gloves by Sue's Crochet and Knitting

My Latest Crochet Projects with pattern sources by Over The Apple Tree
Crochet Cape, see more info here

My Latest Crochet Projects with pattern sources by Over The Apple Tree
Crochet Whale, see more info here

Thanks for taking a look at my projects:-)

I will be sharing with these great blogs!


Follow me here:

Wednesday, September 28, 2016

Crochet Scarf- Color Pooling

Crochet trends come and go. Some of them I try, some I don't. This planned color pooling was too cool for me to pass up! If you follow any crochet groups on social media, you would have seen multiple projects using this method by now.  If this is your first time, prepare to be amazed at what you can do with variegated yarn!

Crochet Scarf- Color Pooling by Over The Apple Tree

Wednesday, August 31, 2016

Crochet Whale Project

"Can you crochet a whale?"

Crochet Whale by Over The Apple Tree

Well, I never would have thought of crocheting a whale. I mean what the heck for? I don't have a special affinity for marine mammals or live anywhere near the ocean. But when my family asks for something, I do it. I started searching for patterns and sending them to my brother to figure out what he had in mind. I knew he would have a very specific idea of what he wanted. Now here's what you get when a man is shopping for his male friend's new baby, of the few possibilities I found, this is the feedback I got..."Not the one with the blue eyes. Make them black and angry looking, I'm trying to scare his baby."

Wednesday, August 17, 2016

Girl's Crochet Cape

With fall around the corner, what little girl doesn't need a cozy cape!

Crochet Cape with flowers by Over The Apple Tree

This cape was made with this free pattern, Red Riding Hood And The Wolf pattern from Red Heart. What a difference a color change makes right?


One of the reasons I love Ravelry is that you can see other people's finished projects and read their comments or tips on the patterns. I post a lot of my projects there. All the comments on this pattern kept saying how small it was, small enough to fit a toddler. I thought, well, great, that's what I'm going for! This little cape is for my 1 1/2 yr old niece. I did the whole thing with my new 5.5 mm hook and guess what? It was big enough to fit my 7 yr old! Oh, all that time wasted...I had to pull it all out and start over again.

I realize the pattern calls for a 5 mm hook but I didn't really think it would make that big of a difference. Before I pulled out my project and my hair, I got my niece's measurements and compared them to what I had done. Since the hood needed to be a bit smaller, I decreased my center section to 60sc instead of 70. I added 5dc onto each of the side sections. My starting ribbing is the same 126 rows called for in the pattern. Sizes for crochet always depend on a person's own tension, you could get a different result than me as far as size goes.

Crochet Cape with flowers by Over The Apple Tree

Crochet Cape with flowers by Over The Apple Tree

This cape is really simple. It's all worked in one piece, then folded in half and sewed up the back. A great way to keep track of your rows when you first start is to use stitch markers. I marked every 50 rows of the ribbing so I wouldn't have to keep starting over my count. When I got to the main cape section, I used 2 stitch markers throughout the project to mark where my sc section began and ended. Another great way to use the stitch markers is to stick them in the beginning of your short row A so you don't loose track of how many sections you've done. I'm always picking up and putting down my projects, so these short rows would have gotten really confusing if I didn't mark it somehow.

I used two balls of Michael's Loops & Threads Impeccable Yarn and a 5.5 mm hook.

Crochet Cape with flowers by Over The Apple Tree

Crochet Cape with flowers by Over The Apple Tree

Crochet Cape with flowers by Over The Apple Tree

Crochet Cape with flowers by Over The Apple Tree

Crochet Cape with flowers by Over The Apple Tree


I will be sharing with these great blogs!


Follow me here:

Wednesday, August 3, 2016

DIY Cheap Tufted Headboard

My house is still a work in progress and my bedroom is the last to get any special attention. I've been scoping out headboard tutorials for a while and this project ended up using a little bit of everything from all the inspiration I found on Pinterest.

DIY Cheap Tufted Headboard- Made with a piece of $10 styrofoam insulation board and faux fabric buttons by Over The Apple Tree

If you read my blog, you know I like to find the cheapest way to make things. That's one of the reasons I chose to use Styrofoam insulation board as the base for this headboard. One board cost me less than $10. The second reason is that it's incredibly light weight which makes it very easy to maneuver by myself and I could cut it to size with a kitchen knife.

So with the pros of the Styrofoam, there are also cons. You can't really nail, tack or staple into it because everything will just slide out. I'm also not 100% sure yet how durable this will prove to be. I have to admit, halfway through this project I was wondering if I made a mistake by not just going with the wood. I stuck it out, improvising along the way, and ended up with a beautiful inexpensive headboard that I love!

The supplies I purchased:
  • Styrofoam Insulation Board $9.57
  • 2 1/2 yards of fabric $6.25
  • Batting $7.97
  • Command Strips $3.94
  • duct tape

Thursday, July 21, 2016

Family Camping 2016

Summer vacation means it's time to go camping! This past weekend we headed up to Grand Lake, CO for some outdoor family fun.

Family Camping 2016- Over The Apple Tree

Family Camping 2016- Over The Apple Tree

Camping with a family takes some serious planning. This isn't our first time, so we already have all the camping gear we need. That just leaves meal planning and packing up the car. This isn't exactly a "how to" post, just a glimpse of some ideas I have and some I found online that worked for me.

Family Camping 2016- Over The Apple Tree


Our Meals:
Day 1 Dinner- Hot dogs and Brats
   When you first get to your campsite you have a lot to do with setting everything up. Any easy dinner is best, no need to add to the stress.

Dessert- S'mores!

Day 2 Breakfast- Scrambled eggs, sausage, and biscuits
    Cooked the sausage and eggs on our stove. I forgot to take a photo but this was the first time I made biscuits over a campfire! I got a tube of Pillsbury Grands, placed them in a foil baking pan and covered with foil. Set them on the grate over the fire. Worked great! The bottoms got a little burned but that easily peeled off.

Lunch- Tortilla Chip Tacos
   I prepared beef with taco seasoning ahead of time and I added in a can of black beans. After the meat was cooled, I dumped it in a ziploc bag. This is super fast to heat up over a fire or on a stove. After meat and beans are heated up, just dump on some pre-shredded cheese, pre-chopped lettuce and I brought along some sour cream for me. Everyone can gather around and scoop up with tortilla chips. You don't even need plates!

Family Camping 2016- Over The Apple Tree

Dinner- Chicken Parm Sandwiches
   So these aren't exactly Chicken Parm since my chicken isn't breaded but close enough. Like my lunch, this meat was prepared ahead of time and just reheated. I took chicken breast and cut up into small pieces. I seasoned it and cooked on the stove top with some onions and green peppers. Allow to cool and place in a ziploc bag. For both this and the taco meat, I froze them at home. It stays cold longer and helps to keep the cooler cold longer. I reheated this over the fire in a foil baking pan. Place chicken in roll with some cheese then toast over fire! These were so good,I think I'll start making them at home too!

Family Camping 2016- Over The Apple Tree

Family Camping 2016- Over The Apple Tree

Family Camping 2016- Over The Apple Tree

My daughter wasn't down with chicken so she used the pie iron to make make a spaghetti and garlic bread sandwich!

Family Camping 2016- Over The Apple Tree

Dessert- Apple Crisp
   Prep the crumble mixture at home ahead of time and place in a ziploc. I don't measure stuff but my mixture contains butter, brown sugar, white sugar, flour, oatmeal and cinnamon. This takes some time to cook the apples so start prepping this one same time as dinner. Cut up apples and cover with sugar mixture. Word to the wise...in the past I packed this in aluminum foil and cooked over the fire, occasionally flipping it over so it would cook evenly. Worked great. This year I placed in a foil baking pan and covered...it burned on the bottom. because of the sugar and maybe our too large fire. This one failed this year. I would definitely go back to the foil packet that you flip.

Family Camping 2016- Over The Apple Tree

Day 3 Breakfast- Cereal or whatever you an find in the cooler while I'm packing!
   It's already time to go and check out at this campsite is 11am. Some of us had cereal and others decided Chef Boyardee sounded good. Anything fast and not a lot of clean up is good for me.


The Dollar Store has some great supplies you can use for camping. Here's what I bought there before we left:
Family Camping 2016- Over The Apple Tree
  • outdoor solar lights
  • plastic table cloth
  • foil baking pans
  • kid toys(shovel & bucket)
  • plastic spoons
  • hand sanitizer
  • glow sticks
  • playing cards
  • kid flashlights
  • matches

There is wildlife everywhere here so you have to pack your food back in your car at night unless you want a visit from a bear. Rubbermaid bins are a perfect way to pack your nonperishable food. We also used another bin to pack and store our camping supplies.

Family Camping 2016- Over The Apple Tree

Family Camping 2016- Over The Apple Tree

Entertainment is essential with kids. It takes about five minutes for them to get bored. Before we left I printed them maps to color in for the license plate game and a scavenger hunt list. I should have also printed them a real map to where we were going so they could follow along the route. I can't tell you how many times I was asked "How much longer?" We've stayed at this particular campsite before(Elk Creek Campground) and we come back because it's perfect for us. Besides the perfect location right outside of Rocky Mountain National Park, they have awesome bathrooms, a game room, playground, and small stream running through the property. My kids had a great time panning for gold and trying to catch minnows.

Family Camping 2016- Over The Apple Tree

Family Camping 2016- Over The Apple Tree

Family Camping 2016- Over The Apple Tree

Family Camping 2016- Over The Apple Tree

Going on a long car trip? Make a seat belt travel pillow!


Thank you so much for visiting my blog!
Project Gallery

I will be sharing with these great blogs!


Follow me here:


Related Posts Plugin for WordPress, Blogger...