
I was inspired by the Outlander TV series to create some more textured crochet items for my store. After making a few fingerless gloves, I took a stab at creating my own design. I came up with this pattern almost a year ago and finally decided to type it up and offer it for free. Happy Holidays!
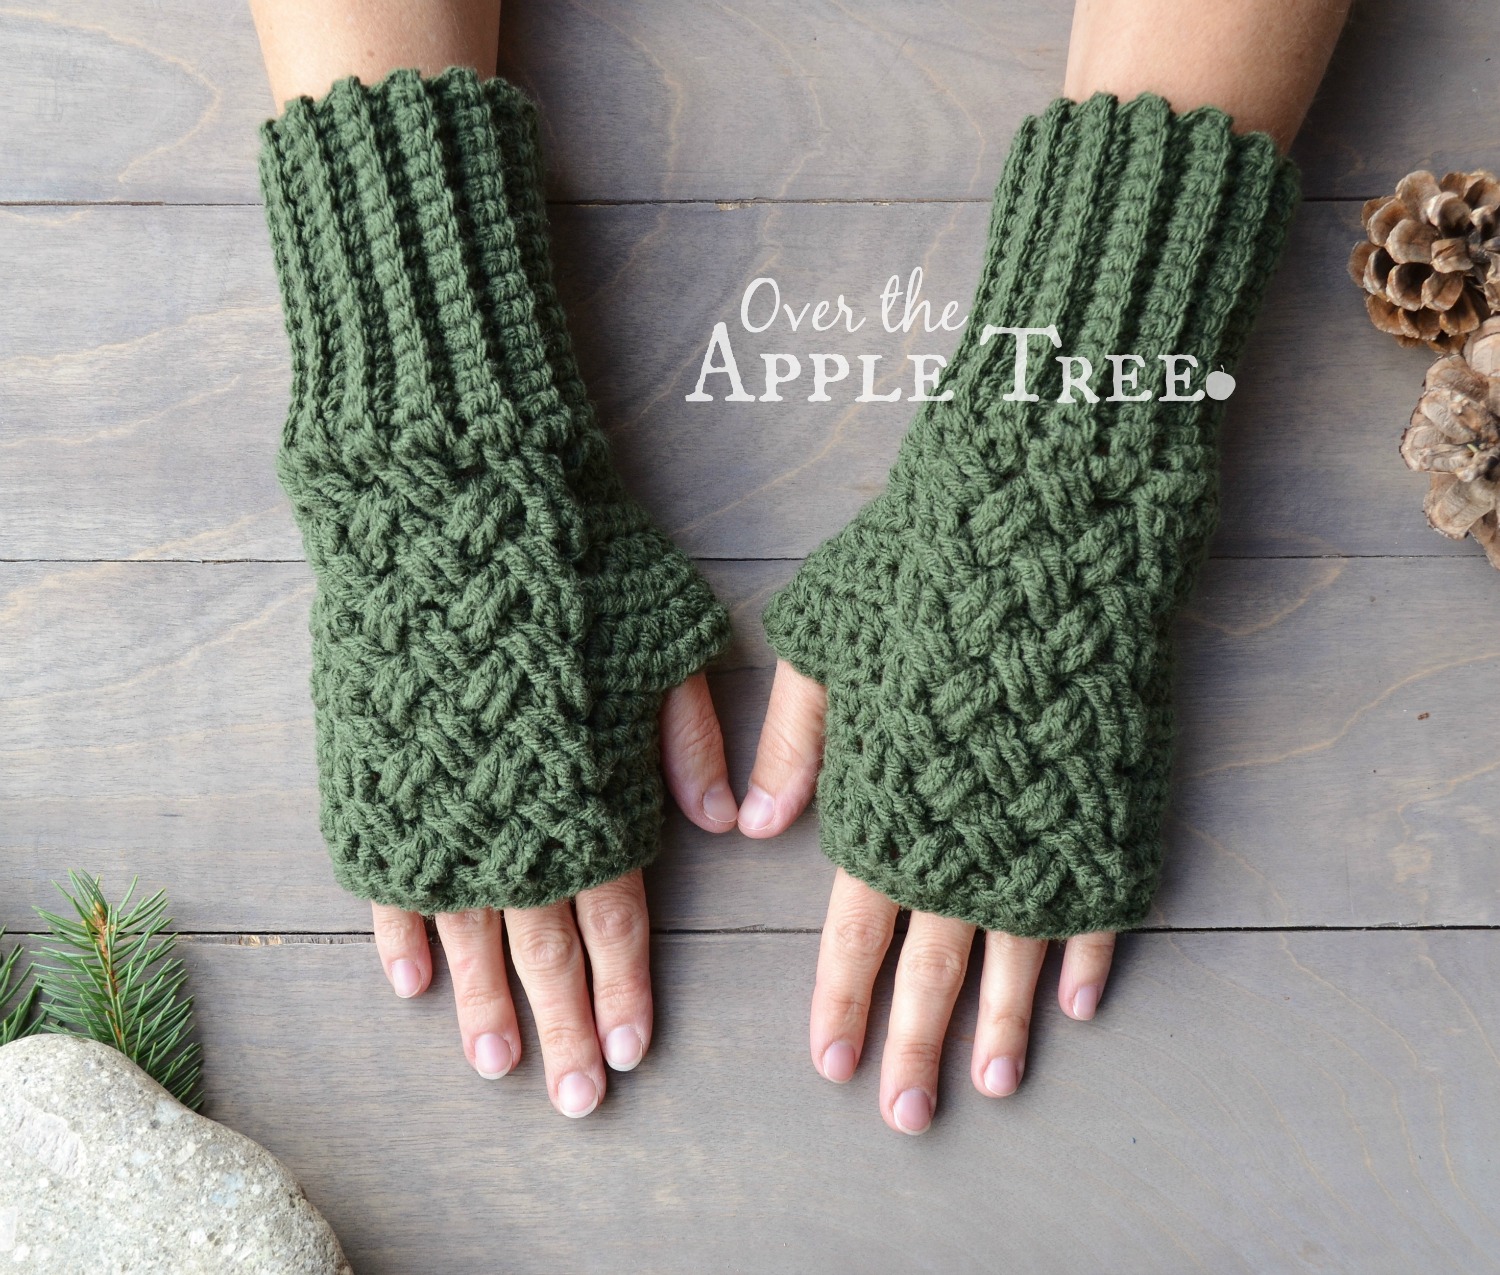
I tried to make this pattern as easy to follow as possible with the color coded sections, but I would not recommend this project for beginners.
Here is a helpful Celtic weave video tutorial from Pattern Paradise.
US crochet terms
Worsted weight yarn
Hook size G(4.25)
BPTC= Back Post Treble Crochet
FPTC= Front Post Treble Crochet
Wristband
Ch 16 (Feel free to adjust length to make longer or shorter cuffs)
1. Sc in second from hook and in each chain to the end. Ch 1, turn(15)
2.-28. 15 sc in BLO. ch 1, turn (15)
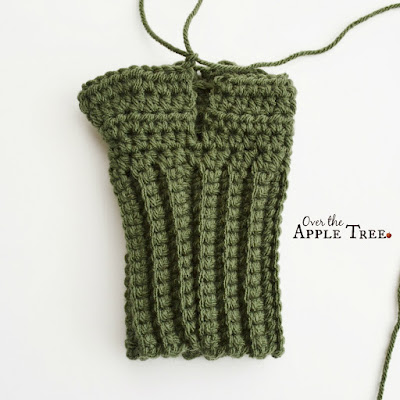
Join last row to beginning chain with sl st to form the cuff. Turn inside out so that the sl st seam is on the inside. Rotate to work top of glove along the sides of the rows.
*Note: I have 28 rows for the cuff and then I say to work 30 hdc in row 1 top of glove. I did this because I have skinny wrists and preferred my cuff to be tighter. It means you will have to work 2 hdc in a couple of the stitches for row 1 top of glove. If it makes you more comfortable, you can increase the cuff to 30 rows for it to come out even.
LEFT GLOVE
Top of glove
1. Ch 2, work 30 hdc into ends of sc rows on cuff. Join with sl st to first hdc. Do not turn yet.
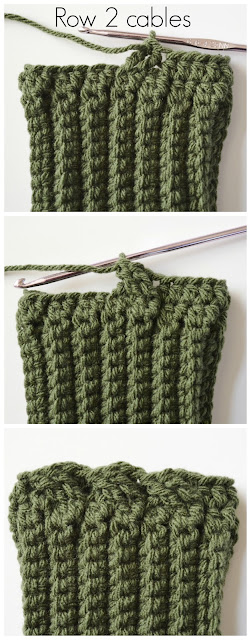
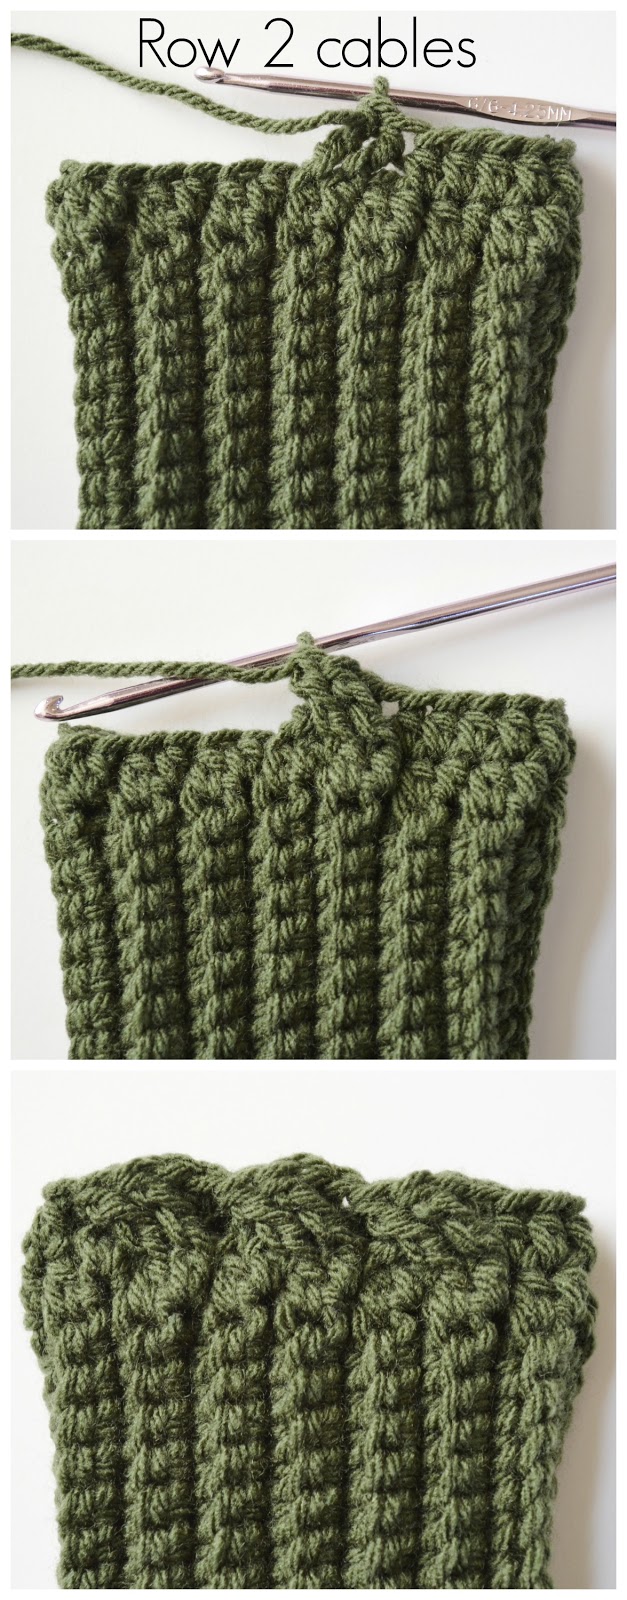
2. Ch2, 1 hdc in same as join, 8 hdc *(sk 2, FPTC around next 2, FPTC around 2 skipped) Repeat from* 2 more times. 9 hdc. Ch 2, turn
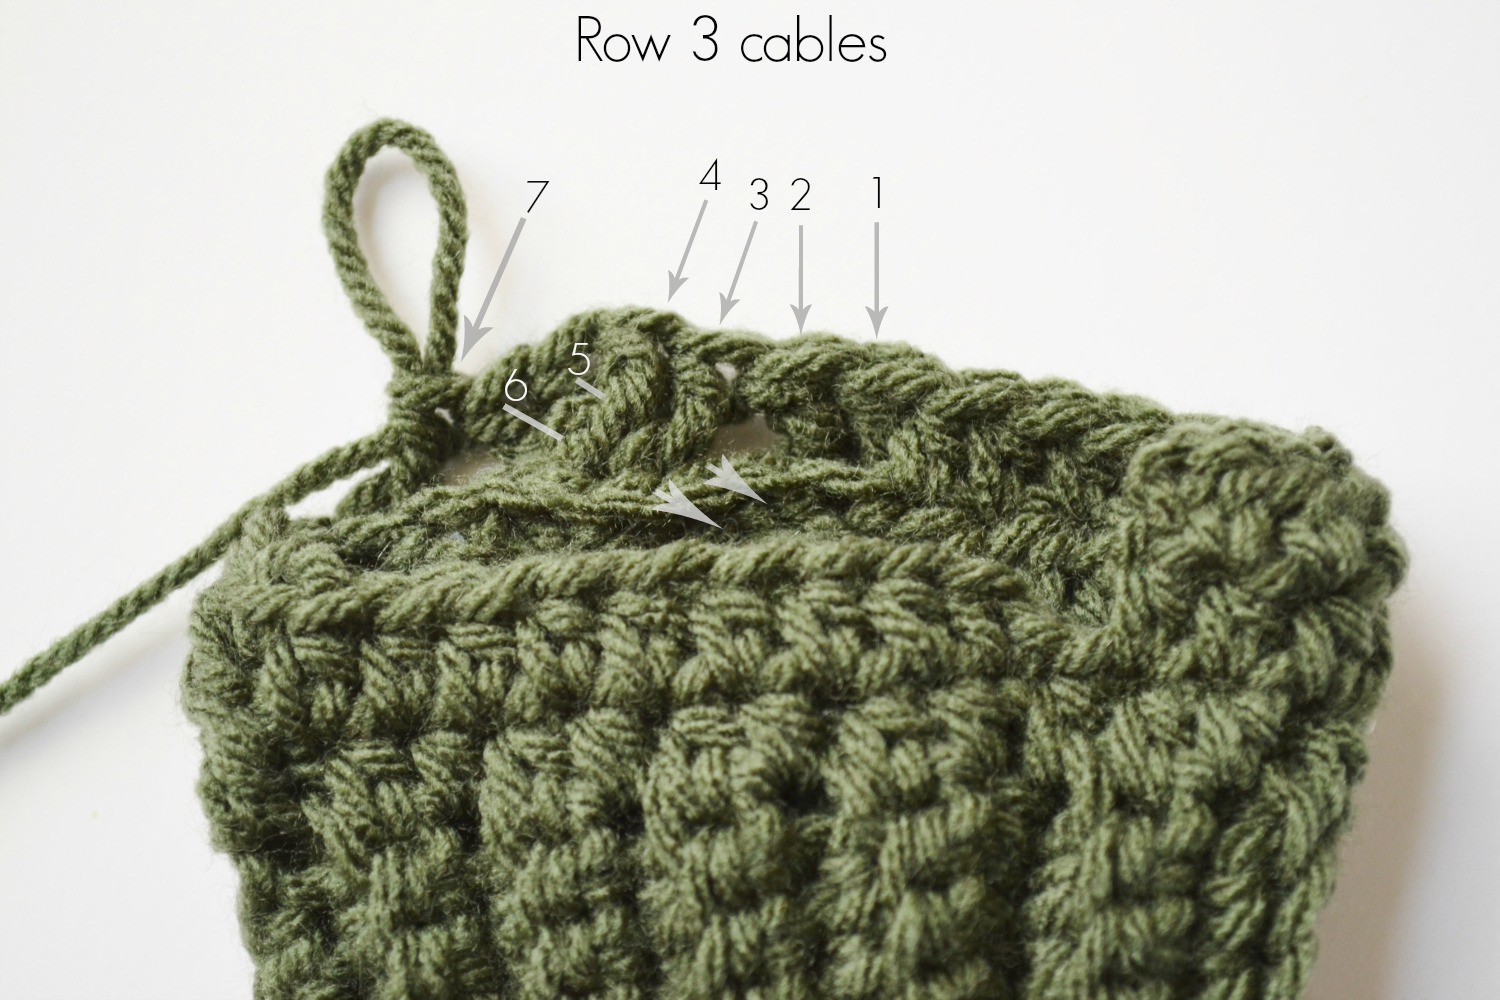
3. 9 hdc, BPTC around first 2, *(sk 2, BPTC around next 2, BPTC around 2 skipped posts). Repeat from*, BPTC around last two, 3hdc, 2 hdc in each of the next two stitches, 4 hdc. Ch 2, turn
4. 4 hdc, 2 hdc in same, 2 hdc, 2 hdc in same, 3 hdc, (repeat cables row 2), 9 hdc, ch 2, turn
5. 9 hdc, (repeat cables row 3), 3 hdc, 2hdc in same, 4hdc, 2 hdc in same, 4 hdc. Ch 2, turn
6. 4 hdc, 2 hdc in same, 6 hdc, 2 hdc in same, 3 hdc, (repeat cables row 2), 9hdc. Ch 2, turn
7. 9 hdc (repeat cables row 3), 3 hdc, 2 hdc in same, 8 hdc, 2 hdc in same, 4 hdc. Ch 2, turn
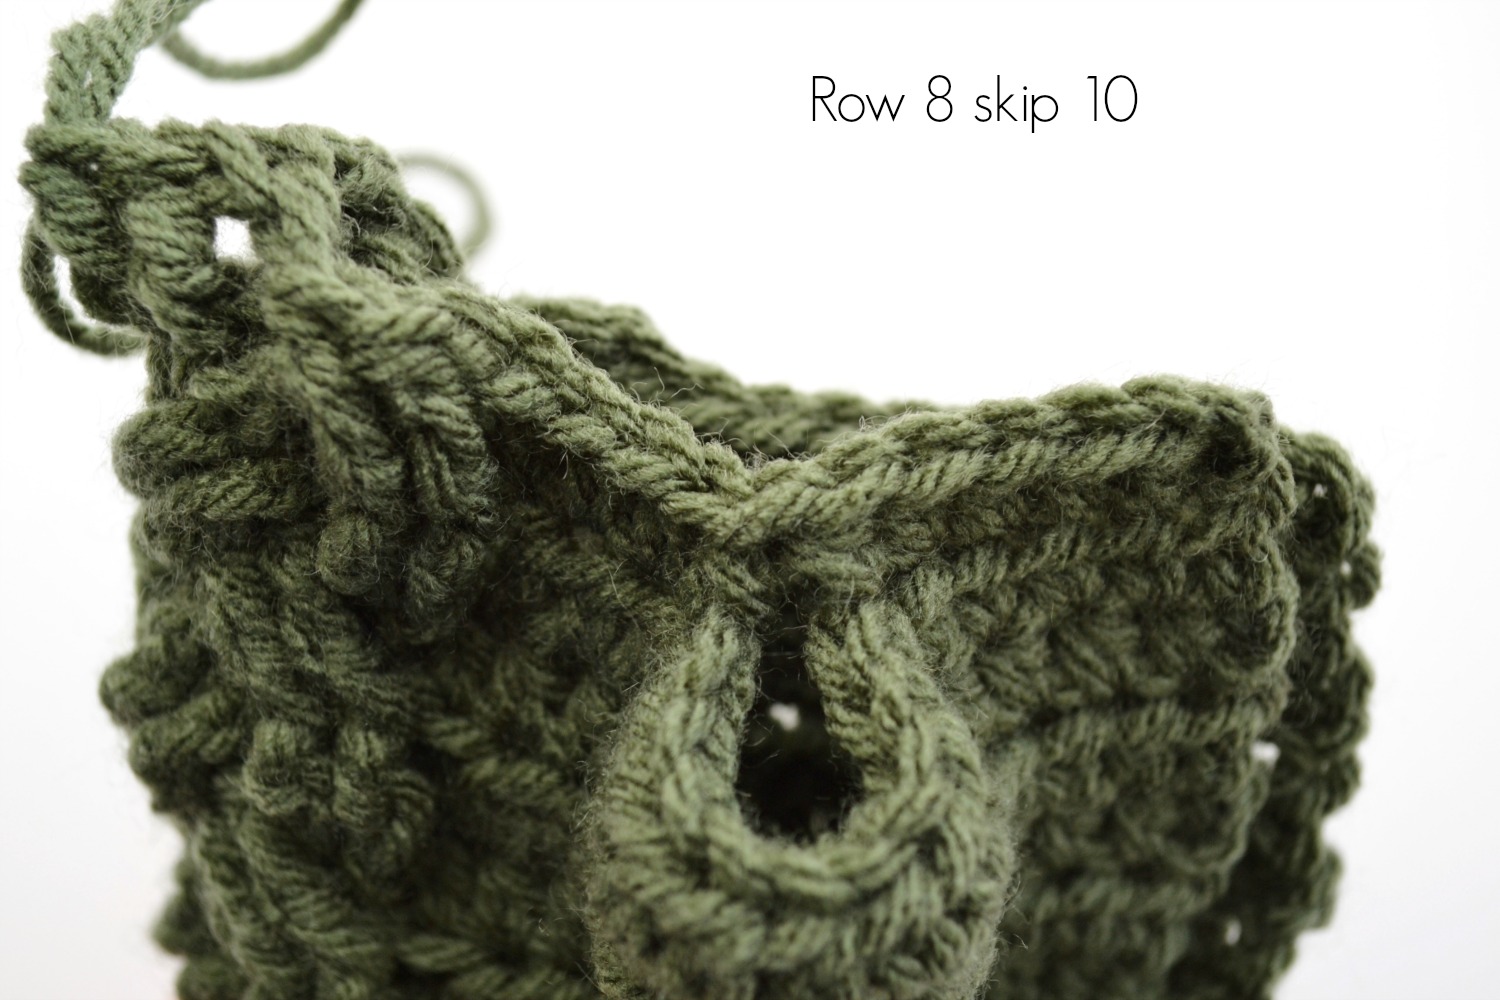
8. 5 hdc, skip 10, 4hdc, (repeat cables row 2), 9 hdc. Ch 2, turn
9. 9 hdc, (repeat cables row 3), 9hdc. Ch2 turn
10. 9 hdc, (repeat cables row 2), 9hdc. Ch2, turn
11. 9 hdc, (repeat cables row 3), 9hdc. Ch 2, turn
12. 9hdc, 12 sc, 9hdc. Ch1, turn
13. sl st across. Leave long tail to sew together
For RIGHT GLOVE start the same as for left glove but for rows 3-8 top of glove, flip the side with the increases for the thumb hole but still work the cables the same. So row three, right hand would be... 4hdc, 2 hdc in each of the next two stitches, 3 hdc, BPTC around first 2, *(sk 2, BPTC around next 2, BPTC around 2 skipped posts). Repeat from*, BPTC around last two, 9hdc. Ch 2, turn


❄If you make these gloves to sell, please be courteous and give credit to me as the designer with a link back to this blog post. Do not copy and post this pattern or claim it as your own. Do not try to sell this pattern. Do not re-publish photos as your own.
Save pattern in Ravelry!
Love crochet? See more of my projects here
I will be sharing with these great blogs!
Follow me here:
These are beautiful!!! Thank you so much for sharing the pattern!
ReplyDeleteThank you Darlene. Let me know how it goes if you try it!
DeleteBeautiful! I can't wait to try this!
ReplyDeleteI've been an Outlander fan for almost 10 years! I'm loving the shows now. I just learned to crochet and I'm so glad to be able to replicate some of the items featured on the show. Can't wait to try your pattern. Thanks!
ReplyDeleteThese are really pretty! Pinning to make later!
ReplyDeleteHi Laura, wow your hand warmers are just beautiful. You did a great job and thanks for the pattern to make them.
ReplyDeleteThanks for sharing this at C&C with J&J.
Julie
These are so pretty. I'll have to add them to my ridiculously long list of things I want to make. :)
ReplyDeletecalennaj.wordpress.com
These are really lovely! Frequently I prefer the appearance of knit items to crocheted ones, but these gloves are definitely an exception!
ReplyDeleteOh my, these are so striking! My daughter can knit, but hasn't tried crocheting yet...I juuust might show her this post while hinting that her mom would love some of these to warm and style up her cold, cold hands... --Ginger
ReplyDeleteThese are SO pretty. It's the nicest pattern I've seen. I wish I knew how to crochet. My daughter does though so I'll show her the pattern. Thank you for sharing the instructions. Have a Merry Christmas!
ReplyDeleteTamara x
These are so pretty!
ReplyDeleteI would love for you to share this with my Facebook Group for recipes, crafts, tips, and tricks: https://www.facebook.com/groups/pluckyrecipescraftstips/
Thanks for joining Cooking and Crafting with J & J!
These are simply lovely! Beautiful photos as well! Thank you, for sharing! You are one of the features at the Make it Pretty Monday party at The Dedicated House. Here's the link to this week's bash! http://www.thededicatedhouse.com/2016/12/make-pretty-monday-week-202.html Have a happy week! Toodles, Kathryn @TheDedicatedHouse
ReplyDeleteThat's great, thank you so much!
DeleteWow, these are incredibly stunning!
ReplyDeleteOh I love Outlander, I can't wait for the new series to start and your gloves have the perfect "Outlandish" look Laura. Now if only I knew how to crochet ;-) Oh well a girl can dream
ReplyDeleteI've made the left glove but I'm stuck on the right one... Can you please help me out?
ReplyDeleteWhich part do you need help?
DeleteOk I think I got it... I was flipping the cables as well... Silly me! Thank you for your quick response!!
DeleteSaw your Celtic Mitts in the latest issue of Moogly Hooking on Hump Day - just gorgeous!
ReplyDeleteInstead of stitching at the end, why don't you slip stitch at the end of each row?
ReplyDeleteYeah, I thought about that too.
DeleteI look forward to making these.
ReplyDeleteI have tiny wrists as well as small hands. I'm concerned that the glove will be too loose. Will the pattern work out correctly if I continue with 28 stitches instead of 30 by eliminating 1 stitch at the beginning and end of the row?
ReplyDeleteThese Celtic fingerless gloves are super cute! I am so ecstatic that you shared the pattern with us.TY :)
ReplyDeleteQuestion - about how much yarn did you use? The whole skein? More than one? Thanks!
ReplyDeleteLess than one
DeleteHey these are lovely thank you! I find that doing the slip stitch at the top makes them really tight at the top, I know it's likely my tension but it feels nicer skipping that last row and having them stretchy at the top. Anyway, they're gorgeous so thank you!
ReplyDeleteThank you so much for posting this pattern! The fingerless gloves I made are not only cozy, they're beautiful!
ReplyDeleteThank you for your gorgeous pattern ! I'm crochetting it right now !
ReplyDeleteHow much yarn did you use?
ReplyDeleteHi Laura!
ReplyDeleteFound your fingerless gloves while doing a Google search; wanted something lovely for my sister-in-law's birthday. Absolutely love them!
But I am curious... Why can't these be made in the round, still turning at each round, so that they don't need to be sewn up at the end?
Gina
You can do that if you want, just be sure to keep track where your first stitch goes. I prefer not to, I think it's easier to work with.
DeleteThank you, Laura! I'll give it a try and let you know how I make out. I'm having a hard time sewing up the left glove - it looks butchered, LOL! I'll keep trying. Thanks again!
DeleteI love this pattern!...but I cannot the weave to work...I’ve watched numerous videos and they always come out twisted. I’m so frustrated as I can’t figure out what I’m doing wrong! HELP!
ReplyDeleteOh, I'm sorry to hear that! I don't know how to help without know what you're doing wrong. The only thing I can tell you is to watch the video tutorial link I included. Maybe take a break and go back and try again.
DeleteI am having a problem with the hdc instruction between row 3 and 4. I keep coming up with an extra stitch. I'm not sure what the 2hdc in italics means. Please help.
ReplyDeleteRow 3 starts the increase for the thumb. Rows 3-7 you'll be doing 2hdc in the same stitch twice with an increasing number of stitches between the increases. If you look ahead a little you'll see the pattern...row 4 has two stitches between the increases, row 5 has four stitches, row 6 has six stitches, row 7 has eight stitches between the increases. The italics are to help point out the difference in the pattern for each row.
DeleteI like your pattern. I did write out the instructions for rows 3 - 8 for the right glove: __ 3: WS-4 hdc, 2 hdc in each of the next two stitches, 3hdc, BPTC around first 2, *(sk 2, BPTC around next 2, BPTC around 2 skipped posts). Repeat from*, BPTC around last two, 9 hdc. Ch 2, turn
ReplyDelete__ 4: FS-9 hdc, (repeat cables row 2), 3 hdc, 2 hdc in same, 2 hdc, 2 hdc in same, 4 hdc, ch 2, turn
__ 5: WS-4 hdc, 2hdc in same, 4hdc, 2 hdc in same, 3 hdc, (repeat cables row 3), 9 hdc, Ch 2, turn
__ 6: FS-9 hdc, (repeat cables row 2), 3 hdc, 2 hdc in same, 6 hdc, 2 hdc in same, 4 hdc. Ch 2, turn
__ 7: WS-4 hdc, 2 hdc in same, 8 hdc, 2 hdc in same, 3 hdc (repeat cables row 3), 9 hdc. Ch 2, turn
__ 8: FS-9 hdc, (repeat cables row 2), 5 hdc, skip 10, 4hdc. Ch 2, turn
.
How would you have done the pattern in the round?
Hello, how many balls of wool are needed for this project?
ReplyDeleteI used about 1 and 1/2 skein, 75 g :)
DeleteI love these!!! Working on my second pair right now in the same green color as yours as a christmas gift for my boyfriend. I made the first pair with thicker white wool yarn and crocheted tight + skipped the last row of cables. I also chose to make the ribbing shorter. Thanks for this beautiful easy to follow pattern! <3 <3 <3
ReplyDeleteIs there a certain set of multiples to this pattern? I'm going to be using a thinner yarn and smaller hook, so I just wonder if it is in two's, there's, five's, etc. Thanks.
ReplyDeleteYou might have to add another set of cables and probably make the thumb hole bigger. I couldn't say without trying it.
DeleteI just finished a pair using black yarn with a bit of sparkle to it. The yarn was horrible to work with on this pattern... But the pattern itself is fantastic! I made my ribbed bands shorter by half and also joined my rounds. Thank you so much for such a fun pattern... I thoroughly enjoy it!
ReplyDeleteGreat to hear, thank you!
DeleteI love this pattern! My only thing is it was too small for me, seeing as I'm a big girl, but luckily it was easy to modify. Still working on it, so hopefully my modifications work or okay. I'm also working in the round, as opposed to stiching it. I prefer the rounds myself. If i wanted to post this for bigger ladies, would you be okay with that? As long as I link you? I'm contemplating starting a blog of modified patterns and patterns i come up with myself. I haven't yet, but i hope to. And i would love to add this into it.
ReplyDeleteHi Jess, Sorry I just saw your comment, it was in my spam folder. I'm glad you like my pattern. As far as publishing it on your own blog, I'd prefer if you didn't repost the whole pattern however if you said "I did this instead of that" or "I added stitches in row.." That would be cool.
DeleteI'm having trouble with row four. I don't know what you mean by "in same." Could you explain?
ReplyDeleteIf at all possible could you make a video. I have problems reading and understanding patterns but can follow a video with no problem. I would love to give these a go for my daughter
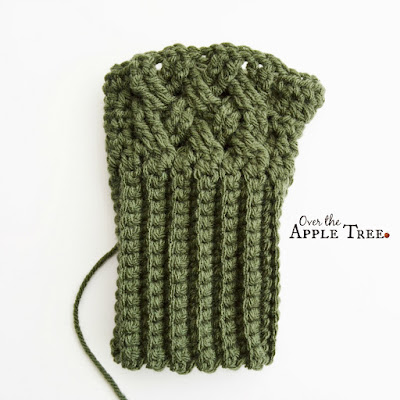
ReplyDeleteI love that more people are making things with the Celtic weave! It is my favorite. Thank you for making this pattern available. I am finding that the Celtic weave portion for every row is about 1/2” taller than the row of HDC on either side. Does this eventually even out at the top, or should I go back and do DCs?
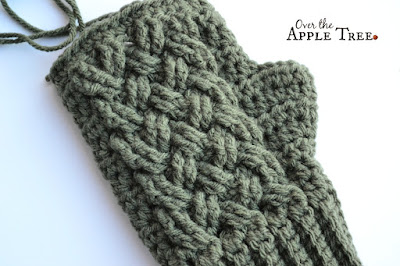
ReplyDeleteIf you take a look at the pictures of the gloves laying flat, the weave portion ends up slightly rounded.
DeleteHalf way through my second pair as love the first ones. Struggled a lot with the originals, but got there in the end plus created a small crocheted lining for the main part of the mitt. I've done first mitt of my second (and thicker) pair and as it's about a year since I did first pair, struggled again but did it. So looking forward to wearing these on colder days. I did slightly longer cuff and a few extra rows of cable pattern too. Fabulous design, thank you.
ReplyDeleteHeather
(can't change user name :( )
Hi! I love these - but I have to ask, do you have a matching hat pattern? I love this Celtic look!
ReplyDeleteThank you! I don't have one, but search for the celtic dream crochet beanie.
DeleteThanks so much!! I dont remember doing ribbing for the top of this glove, but I think I've seen other people post pics like that. To get the ribbing so that it matches the bottom ribbing, after your last weave row dont cut the yarn. Chain how wide you want the ribbing, include a turn chain, then sc in the row of chains you just made. At the end, sl st to the top of the glove.(I usually do 2 sl so there aren't any holes) Turn and sc in blo of your single crochets, ch1, turn...so you do the ribbing same as the cuff working sideways but attaching with sl st to the top of glove. It probably sounds confusing but try it and see if you can get it to work.
ReplyDeleteIn the video shes making turning rows of the weave. For these gloves, it's just a small section of the weave surrounded by hdc. My base is 30 because the weave is multiples of 4 and then on either side of that is 9 hdc. (9+12+9=30) On one side you start to increase for the thumb. So to use smaller yarn you have to increase all the stitch counts, make sure for however many weave repeats you have a multiple of 4 and then the stitch count for the hdc should be the same number on both sides. I used an odd number of hdc so that the thumb increase would be slightly off center. If you're using smaller yarn I dont know how important odd or even numbers will be, you'll have to experiment and see. You still will have to do the thumb slightly towards the back of the glove for proper fit.
ReplyDelete